Sunday, February 6, 2011

herbes de provence biscuits with raspberry sauce


I awoke this morning wanting something really, really yummy to eat. I know; shocking, huh? I had just finished my box of cereal a couple days ago, so my usual grain and yogurt wasn't an option. On a whim, I visited Green Kitchen Stories. It's always such a pretty blog. So fresh! So colorful!

I was hit with an immediate need for biscuits.

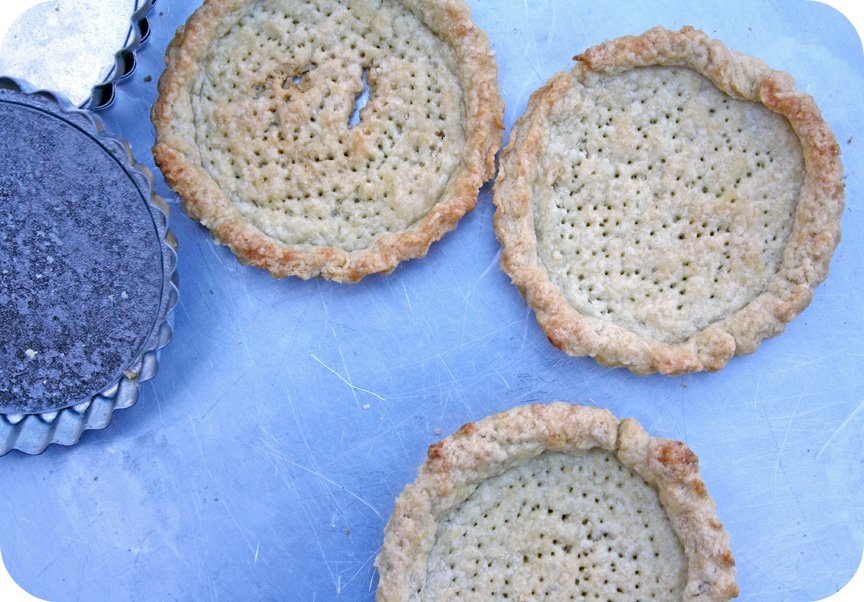
Biscuits and I don't have the best history. We get along fine when I'm making them out of, erm, Bisquick. But whenever I've tried to make them from scratch, they end up like hockey pucks. Or kind of good, but certainly not melt-in-your-mouth delicious like when I eat them at certain restaurants.

I don't know. This recipe, which comes from Coco of Roost but was featured on Green Kitchen Stories, sounded too easy to pass up. I'd had a little bag of almond flour languishing in the freezer for far too long, so I figured at worst I'd end up with inedible biscuits and more room in my freezer. Needless to say, I made 'em. I replaced the rosemary with herbes de Provence and used olive oil instead of grape seed oil. Less than an hour later, I was pulling delicately golden, ever-so-slightly fluffy, herb-scented biscuits from the oven. By far the best biscuits I've ever made. I couldn't believe they used almond (instead of wheat) flour.

I highly recommend these. Especially if you suck at making biscuits as much as I do.


Herbes de Provence Almond Meal Biscuits
Adapted from Roost, by way of Green Kitchen Stories
Makes 7 or 8 large biscuits


2 1/2 cups almond flour, plus 1/2 cup for dusting dough
1/2 tsp. salt
1/2 tsp. baking soda
1/4 cup olive oil
2 eggs
1 Tb. honey
1/2 Tb. herbes de Provence

Oh! I nearly forgot. Raspberry sauce. Yes.

My friend Rachel visited recently and fell madly in love with this raspberry sauce that I make. It barely seemed fair, as it's the second easiest recipe ever. (The first being this one.) She took it back home with her to Seattle, and I hear she's now converting more devotees to the beguiling tartness of this multi-purpose sauce.

Just a few ideas: I like to spoon this over Dutch babies. It foils their richness nicely. I also love love love it with plain yogurt and granola. It's great with oatmeal, and I like to spread it on toast and, clearly, biscuits. Go crazy.


Raspberry Sauce


Some frozen raspberries (half a package or so)
1 Tb. honey (or to taste)
Some citrus zest if you're feeling fancy

Put the berries in a small saucepan on low. Stir them as they defrost and soften. Once defrosted, add the honey and stir. Add the zest now if you're into that sort of thing. Allow berries to simmer slightly for a few minutes, and add more honey as needed. Crush any intact berries with a wooden spoon. Pour into a bowl to serve, or let cool and put in the refrigerator for later.

Monday, January 24, 2011

how to make your lover melt (a.k.a. cornmeal spoonbread)


Well. It has been a while, hasn't it?

We've missed you, you wonderful Thin Crust Deep Dish readers. But we're back now.

Hi.

The fact that we haven't been here, though, doesn't mean we've been doing nothing. Far from it. Since we last checked in, Adriana's graduated from culinary school. (Or maybe you already knew that? I can't even remember, that's how long it's been.) And I've gotten a new full-time job. It's gay-er than the last one, which means it gets major bonus points in the Cool Job category.

Oh, and, you know, ADRIANA STARTED A BUSINESS and ohmygosh it's the greatest thing since, well, spoonbread, which is what we'll be discussing today, coincidentally. Seriously, though, Adriana's pet portraits are truly adorable, and you really should check them out, even if, like me, you don't yet have a pet but simply like to fawn over them.

Speaking of businesses, I've started one, as well. It combines my love of making people feel beautiful through portrait photography with figuring out how to bring that beauty to the world through life coaching. It's a seriously good time.

Both of us usually blog twice a week at our respective websites, so if you're jonesing to hear from us more often, we'd love to have you visit.

Otherwise, we'll be here. Less frequently, sure, but here nonetheless.


To return to the task at hand, today I'll be sharing the recipe for a spoonbread that will make your lover melt with delight. Or at least that's what it did for me. I made this spoonbread over our December vacation, when we wanted something special for breakfast but weren't in the mood for pancakes. Mary declared it The Greatest Thing I've Ever Made. Usually, I would brush off such a compliment, as she tends to pull it out every time I make something she likes, but she continued to wax poetic about the stuff for days (and now weeks) after. I made it again last week, and the effect was the same.

With that said, ladies and gents, wield this one with caution. And don't say I didn't warn you.

-Kylie


Cornmeal Spoonbread
Adapted from Whole Grains: Every Day, Every Way by Lorna Sass

1 cup fine yellow or white cornmeal, preferably stone-ground, plus 1 Tb. for coating the pan
1 1/8 tsp. salt
1/2 tsp. honey
4 Tb. (1/2 stick) unsalted butter, cut into bits, plus more for coating the pan
1/2 cup well-shaken buttermilk (I used regular milk, and it still turned out spectacular.)
3 large eggs, separated
3 Tb. finely grated cheddar

Serves 4 to 6

Set the rack in the center of the oven and preheat the oven to 375 degrees Fahrenheit. Lightly butter a 1 1/2- or 2-quart souffle dish or an 8-inch square baking pan. Use 1 Tb. of the cornmeal to coat the bottom and sides of the pan. Set aside.

Pour 2 1/2 cups of water into a heavy 2-quart Dutch oven or saucepan. Whisk in the cup of cornmeal until well blended. Set over high heat and bring to a boil. Stir in the salt and honey. Reduce the heat and cook uncovered at a gently boil, stirring frequently to prevent sticking and lumping, until the mixture resembles a thick porridge, 5 to 6 minutes.

Transfer the cornmeal mixture to a large bowl. Add the butter and stir until it melts. Stir in the buttermilk and then the egg yolks.

In a mixing bowl, whip the egg whites to soft peaks. Fold half the whipped whites into the cornmeal mixture until just incorporated. Then gently fold in the remaining whites. Do not overmix. (It's okay to have a few unincorporated streaks of white.) Pour the mixture into the prepared pan.

Place the pan in the oven and bake until the spoonbread puffs up and the edges are golden brown, 30 to 40 minutes. Sprinkle the cheese on top and return pan to the oven until it melts, about 2 minutes. The souffle will remain somewhat jiggly, especially in the center. Serve immediately and with love.

Wednesday, June 23, 2010

Perfect Stove Top Popcorn

Stove Top Popcorn


Have all of you watched Ellen Degeneres's standup DVDs multiple times? No? Just me, then?

Well then surely you tune in to her TV show each time you're home sick or near the television during the week on a national holiday, right? Yep, I thought so.

Ellen's comedy makes me laugh. I'm a weirdo, in that I tend to enjoy clean comedy. I can't really stomach the comedians who make fun of their audience and swear in every other sentence. So when Ellen puts together a whole show of good-natured teasing and wondering at the odder things in everyday life, I really appreciate it.

She does one bit in particular that I think about nearly every time I make popcorn or see somebody else eating it. Basically, she's making fun of the fact that popcorn eating during a movie often turns into a messy conquest to shovel as much popcorn as humanly possible into our gullets, as quickly as possible. For the most part, I tend to eat my kernels of corn one by one, but I know that I'm in the minority. Most people love the crunchy awkwardness of a full mouthful of popped corn all at once. And I'm certainly not going to be the one to deny the masses this pleasure.


This is my tried and true method for popcorn making. It's simple and fast and results in the tastiest movie treat I've found. I like to use coconut oil for the popping, but I think my mom used peanut oil when I was growing up, so don't go thinking you're not allowed to pop some corn if you don't have coconut oil on hand. I took these photos of one particularly tasty batch, which I adorned with pecorino romano, shredded on top of the warm popcorn with a microplane.


Stovetop Popcorn

2/3 cup corn kernels
2 Tbs. Coconut oil
1/4 cup butter
Salt to taste

Note: Before you begin, make sure you have a large pot with its lid nearby, two oven mitts, and a large bowl into which you can dump the popped corn.

Put the coconut oil in the bottom of the pot over medium heat. Melt the coconut oil. Once it has melted, pour in the corn kernels. Place the lid on top of the pot, and, using the oven mitts to hold the top on the pot, shake it from side to side over the flame (I like to lift the pot up off the burner to avoid that metal-on-metal noise). Keep shaking. You're trying to move the kernels around so none of them burn. After a minute or so of shaking (depending on how high the heat is), you will hear the first kernels pop. Continue to shake the pot back and forth. The popping will intensify, and you want to make sure to keep the lid on so the steam stays in there and keeps the corn popping. After a couple minutes, kernels will pop less frequently, with several seconds between pops. Immediately remove the lid, making sure to open the side away from you first so as to avoid the steam, which can burn you. Dump the popped corn into the bowl.

Put the butter in the still-hot pot, and it will melt quickly. Pour it over the popcorn and stir around so everything gets buttery. Season with salt to taste.

Tuesday, April 20, 2010

tequila, taquitos and spice (oh my!)

Barrio Guacamole
I can't say that New York is a hotbed of delicious Mexican food. It wouldn't be true. I've lived here for six years or so now, and I'm just starting to find Mexican food that's dependable and delicious. And spicy. Spicy is always a nice attribute for Mexican food to have.

Still, I want to shorten your learning curve, so I've been doing some research for your benefit. Because I know you're dying to know where, for the love of god, you can find some freshly made tortilla chips and salsa. So here you go.

Barrio Taquitos
Tortilla Flats

Admittedly, none of these photos are actually from Tortilla Flats. I haven't been there since I was in college, and I'm now realizing that that was almost three years ago. Yes, I mark my years in how long it's been since I last visited a restaurant. However, here's what I remember: it was a trek and a half to get to the west-est part of the West Village for this place, but it was worth it. It's so small and packed with kitsch that you feel as if you're inside a Winnebago. The crowd is fun and most likely started drinking before you got there. (This place is just as much of a bar as it is a restaurant.) I'd highly recommend the enchiladas. They came hot and swimming in cheese, just the way I like them. All in all, a stupendous place to meet friends after work or before a weekend night out.

Chavella's Brooklyn
Chavella's

Ellen took me here a few months ago when it was still bitingly cold out, and I went back less than a week later, even though it's quite a walk from the train. That's saying something. This place is tiny, too, though they have outdoor seating now that things are heating up. The guacamole comes with small, soft homemade tortillas. The black bean soup (sopa de frijoles) is extraordinary, and the quesadillas are crispy and full of complimentary flavors. The staff at Chavella's is also really nice, a quality I value highly. One time I asked to take my leftover quesadilla home, and our server accidentally trashed it. She then had a new one made for me, packaged it up and didn't charge us for it. It was one of those rare, sweet things that makes me remember that New Yorkers can be nice.
Barrio Beverages
Barrio

I've been here a few times because it's in Park Slope, Brooklyn, where I find myself spending lots of time, especially in the summer. It's way pricier than the other two, but it's also spicier and has more of a modern twist. Their tortilla chips are lightly salted, fresh, and come with a tomatillo salsa as well as some sort of smoky, very spicy red one. The guacamole is the best I've had and also comes with small homemade tortillas. They make a Puebla pork that comes in a chile arbol peanut mole that's even better than it sounds. It's also incredibly spicy, though, so watch out. Actually, you probably shouldn't take your most spice-sensitive friends here, as almost everything I've tried has a definite bite. When you do make it here, I recommend you try the queso fundido if you're into cheese, and the shrimp quesadilla if you like shrimp even remotely. It's by far the best quesadilla I've had this side of the Mississippi. Oh, and you might want to try the cocktails, too. They're flavorful, unique and very strong.

Barrio Chocolate and Cheese
-Kylie

Tuesday, April 6, 2010

my secret identity


I sort of, kind of have a secret identity. At least, that's how I like to see it. But instead of donning a cape and mask and whisking around Chicago to save the meek and innocent, I don a suit, put on mascara and disappear into Chicago's nightlife. Part-way through culinary school I picked up a job being a night manager at a small, upscale hotel bar and restaurant in Chicago's ritzy Gold Coast neighborhood. Most of the time, I'm all alone, greeting the customers, waiting the tables, making the drinks, and dealing with the most recent trouble-maker. And, goodness, do I bring home my fair share of stories.

What surprised me most about the job, and what has become my favorite part about it, is the way I melt into the background, becoming almost indistinguishable from the rows of high end scotch behind me. My ex-boyfriends, my political views, my favorite color...my whole person vanishes, and I get to be nothing more than the woman who pours the wine.

Some of you may think that sounds terrible, but I find it exhilarating. When I no longer have to be me, I get welcomed in to the secret lives of strangers from all around the world. The financial trader, gripping a Honker's Ale, tells me about his clandestine stash of Ethiopian magic scrolls. The young woman, sipping a dirty martini, tells me about how her grandfather used to give her the olives out of his when she was small. A fiery, middle-aged woman from the west coast, nursing a Chardonnay, explains how she had never imagined she'd marry the brother of her late-fiance. You only think I'm kidding. It really does feel an awful lot like like a secret identity.

And after a long night of mixing martinis and listening, I take off my suit, fold up my secret identity and tuck it into my closet for another day.

Then, once the real Adriana is back in full swing, I go make fresh berry tarts. Two kinds, in fact.

-Adriana


Blueberry tarts with meyer lemon mascarpone cream

and
Strawberry tarts with vanilla mascarpone cream


Pate sucre
8 oz butter
4 oz sugar
1 egg
12 oz pastry flour (or 6oz cake flour + 6oz all purpose flour)

Mascarpone Cream
14 oz mascarpone (sub cream cheese for up to half, if desired)
1/4 cup sour cream
1/4 cup sugar
*for meyer lemon cream add 2 teaspoons finely grated meyer lemon zest
*for vanilla cream add 1 teaspoon grated lemon zest and scant 1/2 teaspoon vanilla extract

To finish
blueberries
strawberries, cored and sliced about 1/4 in thick
apricot jam and/or honey

Make the tart shells (about 6 4-inch shells)

1. Cream butter in a stand mixer or by hand for 3-4 minutes, until fluffy. Add sugar and continue to cream. Add egg and cream until completely fluffy, another couple of minutes.

2. Sift flour. Add flour in two shifts and mix until fully incorporated. Flatten into a disk and refrigerate until firm.

3. Roll out dough to 1/8 in thick. Cut circles a bit larger than the size of your tart pan(s). Lay dough inside, making sure it's lightly pressed flush with the edges and then crimp off the excess dough from the top.

4. Poke bottom and sides of dough shells well with a fork

5. Bake at 350 until the shells are light golden brown. The timing will totally depend on your oven, but it took about 12-15 minutes in mine.

6. Let shells cool completely.


Make the cream

1. Whisk together the first three ingredients until fluffy and well-incorporated.

2. Divide cream in half. Whisk lemon zest into one, whisk lemon zest and vanilla into the other.


Assemble tarts

1. Fill shells with cream and smooth into an even layer

2. Lay berries on top in whatever pattern you think it prettiest!

3. Gently heat the apricot jam and or honey, thinning with a tiny bit of water to get the right consistency for your glaze.

4. Gently brush the tops of the tarts with the glaze.

5. Refrigerate tarts until cream has chilled, at least 2 hours.


Subscribe in a reader

Adriana Willsie and Kylie Springman ©2009