Tuesday, March 30, 2010

'tis the season for eggs

Deviled Eggs

Eggs get a bad rap, and I've had enough of it. Each time I tell someone how much I love eggs, how they're so nutritious and filling and easy to make, they ask me whether it's healthy to eat eggs every day. I'm here to say that eggs can be wonderfully healthy. And I don't just mean the whites. I mean the sunny-orange yolks that ooze out of a poached egg, too.


According to Nourishing Traditions, "eggs are rich in just about every nutrient we have yet discovered, especially fat-soluble vitamins A and D. Eggs also provide sulphur-containing proteins, necessary for the integrity of cell membranes. They are an excellent source of special long-chain fatty acids called EPA and DHA, which play a vital role in the development of the nervous system in the infant and the maintenance of mental acuity in the adult. . . Egg yolk is the most concentrated source known of choline, a B vitamin found in lecithin that is necessary for keeping the cholesterol moving in the blood stream." So eat those egg yolks, alright? Okay.


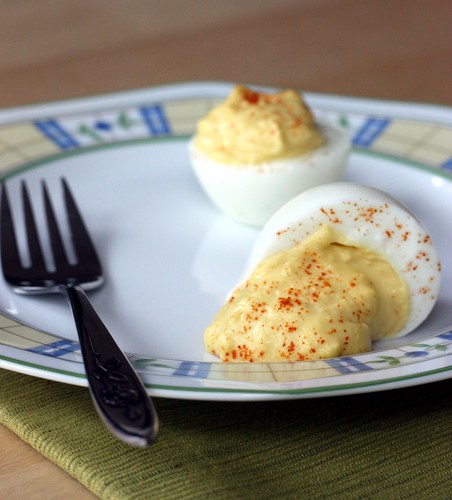
Now that we have that all straightened out, let's get to the actual enjoyment of eggs. After all, 'tis nearly the season of technicolor hard-boiled eggs hiding out in the bushes and the solid week of obligatory egg salad sandwiches that follows. And while I love egg salad (especially with fresh herbs added), I want to share with you my recipe for deviled eggs. So many people love deviled eggs but think they're hard to make, so they only end up eating them once every few years when someone happens to bring them to a party.


Well, here's how I make deviled eggs. They're easy peasy, healthy and yummy, so you have no excuse.   Except if, like me, you have some trouble producing a hard-boiled egg that isn't bubbling out of its shell or splitting in all the wrong places. But that's another matter entirely.


Sad Eggs


I decided to make my own mayonnaise for this batch of eggs, making them even more healthful since they're free of the preservatives in commercial mayonnaise. This recipe from Nourishing Traditions can be fermented so it lasts for months instead of days.


-Kylie


Mayonnaise
Adapted from Nourishing Traditions
Makes 1 1/2 cups


1 whole egg, at room temperature
1 egg yolk, at room temperature
1 teaspoon Dijon-type mustard
1 1/2 tablespoons lemon juice
1 tablespoon whey, optional
3/4-1 cup extra virgin olive oil, expeller-pressed sunflower oil, or a combination
generous pinch sea salt


The addition of whey will help your mayonnaise last longer, adds enzymes and increases nutrient content. Use sunflower oil if you find that olive oil gives too strong a taste. Homemade mayonnaise will be slightly more liquid than store-bought versions.


In your food processor, place egg, egg yolk, mustard, salt and lemon juice and optional whey. Process until well blended, about 30 seconds. Using the attachment that allows you to add liquids drop by drop, add olive oil and/or sunflower oil with the motor running. Taste and check seasoning. You may want to add more salt and lemon juice. If you have added whey, let the mayonnaise sit at room temperature, well covered, for 7 hours before refrigerating. With whey added, mayonnaise will keep several months and will become firmer with time. Without whey, mayonnaise will keep for about two weeks.
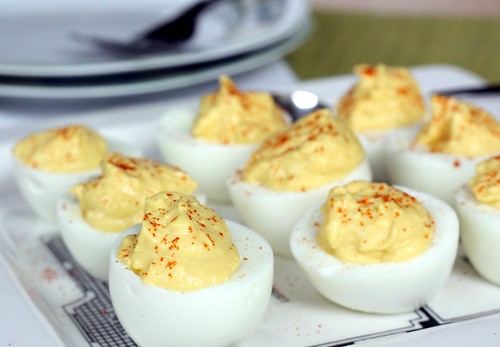

Deviled Eggs
Makes 12 filled egg halves

6 large eggs
1 teaspoon apple cider vinegar
1/4 cup mayonnaise
1 tablespoon Dijon mustard
1 teaspoon apple cider vinegar
salt to taste
garnish of paprika or freshly chopped dill

Place eggs in a medium saucepan and cover by 1 inch with cold water. Bring to a boil, cover loosely with lid, and boil 10 minutes. Drain water and rinse eggs in cold water to stop cooking. Peel eggs. Halve lengthwise or widthwise, and gently remove yolks to a bowl. If you halved the eggs widthwise, cut the very end off the point of each egg half so it can stand with the cavity facing upward.

Mash the yolks with a fork and add mayonnaise, mustard, apple cider vinegar and salt to taste. Stir vigorously with fork until smooth, then spoon into each egg half. Garnish with paprika or freshly chopped dill.


Egg Down!

Tuesday, March 23, 2010

love in the time of frito pie


This time two days ago I was sitting on a comfy wooden chair in a lodge in the mountains of Taos, New Mexico watching two very good friends get hitched.

She had added a pair of cowboy boots and a teal shawl she had knitted herself to the white-dress ensemble.  He was wearing a vest embroidered with dandelions.  There wasn't a dry eye in the house.

I don't believe I've ever seen another wedding quite like it.  Nor do I expect to anytime soon.  I can only imagine that the 30 other guests who had managed to scramble through the freak New Mexico snow storm to get there would feel the same.  And whether it was because of the fires in the fireplaces, the board games scattered throughout the rooms, or the fact that many of us wore our pajamas to breakfast (ok, maybe just me), I have never before seen such happy guests, such a serene bride and such a calm groom.  In fact, about an hour and a half before the ceremony was to start, the bride looked down at her hands, noticed that only half her nails were painted and wondered aloud if she would get around to painting the other half before she got married.

Mark and Grace, you have so many wonderful years ahead of you.

One of the weekend's highlights (though there were almost too many to count) was the toasty lunch that the wedding party prepared for us on the day of the ceremony.  Have you ever heard of "frito pie"?  Well, I certainly hadn't.  Apparently it's a dish very near and dear to the hearts of those lucky enough to reside in the Southwest.  It basically consists of a bowl of fritos topped with a variety of additions such as chili, beans, cheese, salsa, sour cream, guacamole, hot sauce and whatever else strikes your fancy.


(Noah and me at the gorge in Taos, NM)

Let me tell you, after freezing your buns off while poking around a ginormous gorge in sub-zero weather, nothing looks better than a steaming bowl of personalized frito pie.  The moment I saw what was for lunch, I knew it had to make an appearance on thin crust deep dish.  Unfortunately, I finished mine off (bowl-licking included) before I remembered to actually take any photos.  That's why the bride was sweet enough to let me "borrow" her lunch for a quick photo shoot.  How many brides would be totally fine with their friends whisking away their bowl of frito pie 2 hours before the wedding so that she could take pictures for her blog.  Not cool, Adriana, not cool.  That said, Grace is very cool and waited patiently until she could tuck in.

So, Mark and Grace, may your life together be as delicious, spicy, unique, and satisfying as a big bowl of frito pie!

Frito Pie 
(a suggestion more than a recipe)


Ingredients
Fritos

Optional Additions:
Warm green chili
Warm meaty chili
Warm beans
Browned and spiced ground meat
Salsa
Sour cream
Grated cheese
Hot sauce
Guacamole
Olives, sliced
Lettuce, shredded
Tomatoes, chopped
Anything else you can think of!

Directions

Step one: Prepare all the toppings as necessary and set out in bowls

Step two: Give everyone a bowl of fritos and a spoon

Step three: Head in the direction of the toppings and go nuts!

P.S. I couldn't help but share with you a small project I've been working on for the last couple of weeks. My boyfriend and I wanted to make a wedding gift for our buddies Mark and Grace that embodied their handmade spirit. Look! We made aprons! My manslice and I made little apron tapestries showing two of the places that Grace and Mark have spent time (Canada and Thailand) so that they might prepare their weeknight dinners with style. Hope you all don't mind me sharing, but the boyfriend and I were just so proud of our handiwork.
-Adriana

Tuesday, March 16, 2010

say it with Thai food

Coconut Mango Sticky Rice

Whenever I go out for Thai food, I order Pad Thai, or Drunken Noodle, or Tom Kha soup and sticky rice. It arrives in front of me, steaming and saucy, and I slurp it down happily, though I have not a clue what's in it. What makes that beguiling orangey-brown sauce on the noodles? What's that firm yet yielding crunch I get every once in a while in a bite of Pad Thai? And really, how do they make that rice so sticky? While I might briefly ponder these questions, the truth is that I don't really care. Those mystery tastes are good ones, and that's enough for me. When the craving for Thai hits, it hits hard, but we're usually not too far from an acceptable vehicle to deliver the delicious goods. I don't have to go about actually thinking about how to create a Thai dish myself.

Which is how I knew Adriana was pretty much the greatest friend on the Earth when, in high school, she made me Pad Thai, from scratch, in her very own kitchen, for my birthday. She got together the rice noodles, the peanuts, the bean sprouts, even procured the tamarind and prepared it all in a wok. She served the luscious noodles in her living room, and I got to savor each delicate cube of tofu, each springy crunch of scallion, within the comfort of a home. I found myself touched that my fearless friend had gone so far out of her way, explored this uncharted culinary territory, simply to provide this birthday girl with her favorite dish. Thinking about it now, I'm growing a little teary, a bit wistful for those days of birthday sleepovers surrounded by teen magazines and nail polish.
...

A couple of weeks ago, when a couple of our Brooklyn friends invited Mary and me over for a home cooked meal at their apartment, I knew I really needed to step up to the plate. They were cooking us dinner, and all I needed to bring was dessert. When somebody's offering you home cooked nourishment at their house, you just kind of want to give back in a big way. Because I knew they loved the coconut mango sticky rice from a nearby Thai restaurant, I decided to dive right in and see what I could finagle in my own kitchen, using honey instead of sugar as a sweetener.

I'll admit that I was pleased with my efforts. The rice steamed effortlessly into perfect stickiness over a pot of boiling water. The honey sweetened the coconut milk into a luscious syrup, and the mangoes added firm freshness to the sticky dessert. It was a hit all around, and while it wasn't as involved as birthday Pad Thai, I think it showed I cared.

Coconut Sauce

Coconut Milk Sticky Rice with Mangoes
Adapted from Epicurious


3 cups sticky rice, soaked overnight in water and drained
2 cups canned or fresh coconut milk
1/2 cup honey
Pinch of salt
4 ripe mangoes

Fill a large pot with about three inches of water. Place drained rice in a fine metal strainer over the pot of rice, making sure the rice doesn't touch the water. Place a paper towel on top of the strainer full of rice, and cover loosely with the pot's lid. Bring the water to a boil and steam rice for 25 minutes, until it is shiny and tender. Add more water during steaming if necessary so the pot doesn't run dry, as that will ruin your pot (just trust me on this one). Alternately, it's fine to cook the rice using a normal rice cooker if you don't have a metal strainer.


Meanwhile, place the coconut milk in a heavy pot and heat over medium heat until hot. Do not boil, as that will curdle the coconut milk. Add the honey and salt and stir to dissolve completely. When the sticky rice is tender, turn it out into a bowl and pour 1 cup of the hot coconut milk over; reserve the rest. Stir to mix the liquid into the rice, then let stand for 20 minutes to an hour to allow the flavors to blend.

Peel the mangoes, and slice the flesh from each side off the pit by running your knife lengthwise about a half inch to the side of the center of the mango. Lay each mango side flat and slice thinly across to make strips.

To serve individually, place an oval mound of sticky rice on each plate, and arrange half a mango beside it. Stir the remaining coconut sauce thoroughly and pass it separately, with a spoon, so guests can add more as they wish.


-Kylie

Mango Bite

Monday, March 8, 2010

slug-mud pies (and why kids don't need currency)


Alright, everyone.  Let's sit and think back for a moment.  Can you remember a time when money was nothing more to you than silly slips of paper that grown ups played with?  Sure, the coins were fun.  At least they were shiny, and you could flick them at little brothers.  But in the end, the stuff wasn't really worth troubling with.

Think back to long ago, before you had a house, apartment or car, before you even had braces or text books.  Was there a time when you didn't need dollars to get what you wanted?

Sometimes when it's drizzling outside and I'm sitting with a mug of tea, I can recall a time when it hadn't yet dawned on me that that money makes the world go round.  Oh, I must have been quite young, 7 or 8 at most, and the whole world was at my chubby fingertips.


Once, when I was hankerin' for a new dress, my friend Nichole and I sewed awkward, smock-like garments and wore them proudly on our stroll around the block.  Then we sewed matching ones for our little brothers, who unfortunately didn't share our excitement.

Then, when I wanted some perfume one day, I dissolved a number of my mom's fancy-smelling face products in a cup of water and added a few drops of food coloring for effect.  "C'est magnifique," I'm sure I told myself of my Paris-worthy potion.  Or at least I would have if I had known a lick of French.  What I actually said probably sounded closer to "tubular."

And one time when I wanted a fresh-baked treat (and my mom had successfully hidden the cookies), I ground up cheerios to make a flour-like substance, added water and mixed it into a dough.  After giving it a quick zap in my EZ-Bake oven, I smeared on some jam and ate my lumpy, cheerio-crumb 'cake' with glee.

Then there was the time that I traded my "slug-mud cake" to my little brother for his big hole in the ground.  Who got the short end of that deal?  Goodness, it's hard to tell.


It wasn't that I didn't have access to the regular conveniences of any polite suburban home.  And I certainly spent my fare share of afternoons whining for ice-cream or drooling over the newest "My Little Pony." It's just that the scraggly pack of neighborhood kids I grew up with got some measure of satisfaction from doing things for our gosh-darn-selves.  I have to believe that these experiences were not unique to my childhood.  Well, okay, maybe these experiences were, but I'm sure you have your own stories to tell about how you bartered, sewed, cooked, and created your way through your formative years.  Do you?  I do hope you share...

Now that I'm (gasp) grown, working two jobs, and living in a bustling metropolis, it's so easy to forget the joys of occasionally disconnecting myself from the 'currency grid.'  After all, it's not often these days that I bust out my home-steading skills to prove I'm not wholly dependent on modern conveniences.

That's why I spent my afternoon making jam.

Yep, jam.  If you had visited my kitchen earlier this afternoon, you would have found me standing in a splattered apron, shaking a wooden spoon in the air, and shouting, "take that, Smuckers.  See who needs your jelly-like products now!"  Then I sat down and ate some fresh baked biscuits slathered with my exquisite lavender-scented strawberry jam.  No EZ-Bake oven required.

P.S.  The jam whispered in my ear that spring is just around the corner.

lavender-scented strawberry jam
method adapted from "Good to the Grain" by Kim Boyce


Ingredients:
3 lbs fresh strawberries
1 cup sugar
1.5 tsp dried lavender flowers

1.  Put a plate in the freezer (you'll need it later).  Fill a large bowl with ice and a bit of water.  Set a slightly smaller bowl to the side.

2.  Hull strawberries and cut the larger ones in half so that all the pieces are roughly the same size.

3.  Put 1/2 cup water in a heavy-bottomed, large pot.  Add sugar and wait a moment for it to dissolve.

4.  Bring mixture to a boil over medium-high heat.  Boil until there are large bubbles moving slowly across the surface, about 5-7 mintues.

5.  Add the strawberries.  Cook, stirring constantly for 20-30 minutes until the jam reduces down into a jammy-texture.  Near the end of the cooking time, add your lavender.  If you have a candy thermometer, cook the liquid until it reaches 210 degrees.

6.  When you think it's done, place a spoonful onto the frozen plate.  It should thicken up to the proper texture immediately.

7.  Pour all the jam into the smaller bowl, and place in the ice bath to cool.  You can give it a few stirs to speed up this process.  When the jam has cooled, store it in an airtight container (I like little jars).

Keeps for 2 weeks.

-Adriana

Tuesday, March 2, 2010

colcannon

Colcannon

I first had Colcannon a month ago. I've made it four times since then. That's how much I like it. A lot.

Now that I write this, I'm not sure what I did for those twenty-four years before Adriana's mom brought this dish into my life. You all met Marcia during our Seven Sumptuous, Scrumptious Soups Week. She's the fiery spirit who birthed Adriana, and a barrel of unpredictable fun. It makes me happy that I get to see her every few months, because she lives considerably closer to me than Adriana does right now.

You never know what you'll be having when you go to dinner at Marcia's. Though, as her husband will attest, whatever the dish is, it will probably use most of the pots and pans in the house to make. Much to Bruce's chagrin, Marcia has a talent for using an exceptional amount of tools for most things she cooks. And I'm completely fine with that. When she feeds her friends and family this well, we really have no right to complain.

Some nights, dinner at Adriana's parents' house will consist of roast chicken. Sometimes you'll be in for a feast of fresh pita bread. And there will always be ample vegetables, the kind that make you moan and wonder how people can categorically dislike them. When you taste the vegetables Marcia makes, vegetable-hating will seem like blasphemy.

One of my favorite things about dinner at Marcia's house is the way she brings history and folklore into the foods she makes. Back when we were in junior high and Marcia was studying Arabic, many of her recipes came directly from her closest Middle Eastern friends. Marcia would tell you with great enthusiasm how the dish was usually made and how it came about historically. When she makes traditional American foods, you'll find her kitchen table littered with old books on colonial cooking. You'll wonder how she found these books, but then you'll realize that that's just the kind of person she is. And when she serves a sourdough bread, she's sure to regale you with tales of different starters and their history through the generations.

Cabbage and Potatoes

So it was that Marcia served Colcannon, my new obsession this winter. She told me it was Irish, which made sense, because it consists almost entirely of potatoes and cabbage. I wondered aloud at how incredibly, comfortingly sweet it tasted on my tongue, and she told me matter-of-factly that it was because she boiled the cabbage in milk. I tried very hard to memorize that nonsensical-sounding name of this new food, and then I returned home and started Googling.

It turns out Colcannon is a wonderfully flexible dish. As Marcia said, it's Irish, and it usually consists of potatoes, cabbage or kale, milk or cream, and butter. Some recipes add diced ham to the mix, or onions, scallions, or garlic. I make it my own way, and this includes keeping the potato skins on, because I love potato skins. No matter how you make it, it will almost surely turn out delicious. It will be the sort of simple food that you want to eat out of a bowl on Friday after a long work week. It will also be the sort of thing that you want to serve alongside corned beef, with a hearty scoop of sauerkraut. It will be the sort of dish that reminds you that there are people behind each recipe, and behind those people, wonderful cultures with absorbing histories.

Colcannon and Butter

Colcannon
Serves at least 6 as a side dish


6 yukon gold or red potatoes
6 leaves of cabbage, very roughly chopped
1/2 cup whole milk
4 Tb. butter
Salt and pepper to taste

Clean the potatoes very well, then place them in a pot and almost cover with water. Put the lid on the pot, bring to a boil, and boil for 45 minutes, or until the largest potato is easy to pierce all the way through with a fork.

Meanwhile, melt 2 Tb. of butter in a Dutch oven or heavy-bottomed pot. Add the cabbage and 1/4 tsp. of salt, and saute slowly, until the cabbage has turned bright green and a leaf with the vein gives when pierced with the fork. Add the milk and let the cabbage and milk just barely simmer for five minutes.

Drain the water from the potatoes, and mash them with the fork. Add one Tb. of butter and mash that in. This needn't be mashed perfectly, as the dish is meant to be hearty. Add the milk and cabbage mixture to the pot with the mashed potatoes, and mix thoroughly until the Colcannon is thick and creamy. Add a few grinds of pepper, and salt to taste. Serve with a small well in the middle of each serving, and place a dollop of butter there to melt.

-Kylie
 

Subscribe in a reader

Adriana Willsie and Kylie Springman ©2009